
You’ve got the holiday spirit, and what better way to showcase it than with some festive DIY Christmas nails? Whether you want to try your hand at classic candy cane stripes or opt for charming snowflakes, there’s a design that’ll suit your style. With just a few tools and a splash of creativity, you can elevate your nail game this season. Curious about the easiest designs to start with? Let’s explore some options that will not only add a festive touch but also impress everyone around you.
Key Takeaways
- Start with clean, shaped nails and apply a base coat to protect and enhance polish adhesion before adding color.
- Choose festive colors like red, green, or icy blue, and consider simple designs like candy cane stripes or snowflakes.
- Use tools like dotting tools and fine brushes for detailed designs, such as Christmas trees or Rudolph the Red-Nosed Reindeer.
- Add glitter or rhinestones for extra sparkle and glamour to your nail art creations.
- Finish with a clear topcoat to seal your designs and allow ample drying time to prevent smudging.
Candy Cane Stripes

There’s something magical about the festive spirit that inspires you to get creative with your nails. One of the easiest and most fun designs you can try is the classic candy cane stripes! Imagine showing off your nails that look just like your favorite holiday treat.
To start, gather your supplies: a bright red nail polish, a crisp white polish, and a thin nail art brush. After applying a base coat, paint all your nails white for a clean canvas.
Once it dries, grab that red polish and dip your brush into it. Carefully draw diagonal stripes across each nail, making sure to leave some white space between them. If you make a mistake, don’t stress! Just use a little cotton swab dipped in nail polish remover to fix it up.
For extra flair, consider adding a shiny top coat to seal your design and give it a glossy finish. You’ll be rocking those candy cane stripes in no time!
Festive Snowflakes
Transform your nails into a winter wonderland with festive snowflake designs! These delicate flakes will surely impress your friends and add a cheerful touch to your holiday look. You don’t need to be a nail artist to create these beauties; just follow a few simple steps!
Start with a base coat to protect your nails and choose a light blue or white polish for that perfect icy effect. Once that’s dry, grab a thin nail art brush or a toothpick. Dip it into white polish and begin drawing little snowflakes. Don’t worry about being perfect; snowflakes are unique, just like you! You can create a classic six-point design or go wild with different shapes—let your creativity flow!
For an extra festive flair, consider adding some glitter or a shiny top coat. This will make your snowflakes sparkle like they’ve just fallen from the sky!
And remember, if you mess up, it’s all part of the fun. Just laugh it off, and start again. Before you know it, you’ll have a stunning snowy masterpiece right at your fingertips!
Christmas Tree Accents

After creating your snowy masterpiece, why not add some festive cheer with Christmas tree accents? These little touches can transform your nails into a holiday wonderland!
Start by picking a vibrant green polish—think of that classic Christmas tree color. You’ll want to paint a triangle shape on one or two of your nails to represent the tree. Don’t worry if it’s not perfect; trees come in all shapes and sizes!
Next, let’s add some decorations! You can use tiny dotting tools or a toothpick to create colorful ornaments. Just dip it in your favorite shades—red, gold, or even sparkly silver—and dot them onto your tree.
If you’re feeling extra crafty, try adding a star on top by using a gold or yellow polish.
Finally, seal your design with a clear topcoat to give it that shiny finish. It’ll not only protect your work but also make it look super festive!
You’ll be the star of your holiday gatherings with these charming Christmas tree accents. So grab your supplies, put on some holiday tunes, and let your creativity shine like the lights on a Christmas tree!
Rudolph the Red-Nosed Reindeer
Rudolph the Red-Nosed Reindeer is a beloved symbol of Christmas cheer, and you can bring this festive character to life on your nails! Imagine sporting cheerful Rudolph designs that’ll definitely light up the holiday season.
You’ll need some basic nail supplies: brown polish for Rudolph’s body, red for that iconic nose, and black for his eyes and antlers.
Start by painting your nails with a soft brown base. Once it dries, grab a fine brush or a dotting tool to create Rudolph’s face. Use the black polish to make two tiny eyes, and don’t forget to add his famous shiny red nose!
For an added touch of whimsy, you can paint tiny antlers on either side of his head. If you’re feeling extra festive, try doing a full Rudolph theme on one nail and add snowflakes or Christmas trees on the others.
This cute design is sure to bring smiles, and it’s a fun way to show off your holiday spirit. Plus, your friends will definitely want to know how you created such adorable nails.
Glittering Ornaments

As the holiday season approaches, your nails can sparkle just like the tree with a glittering ornaments design! Imagine your fingertips twinkling with festive colors, drawing attention and compliments at every holiday gathering.
To get started, gather some nail polish in bright shades like red, green, gold, and silver—just like the ornaments on your tree!
First, paint your base coat in a bold color, letting it dry completely. Then, using a dotting tool or a simple toothpick, create little circles that mimic ornaments. You can mix and match colors, making each nail a mini masterpiece!
Don’t forget to add some glitter polish on top to really make those “ornaments” shine. For an extra touch of fun, you can even use tiny rhinestones to represent the hooks of the ornaments. Just apply them with a bit of clear nail polish.
Once you’re done, seal your work with a top coat to make sure everything stays in place. Trust me, your nails will be the talk of the holiday party, and you’ll feel like a festive superstar!
Jolly Santa Faces
Creating jolly Santa faces on your nails is a fun way to spread holiday cheer. Just imagine showing off tiny, adorable Santas while sipping hot cocoa!
To start, you’ll need a bright red nail polish for Santa’s suit and a white polish for his fluffy beard. A steady hand is key here, so take your time!
First, paint your nails with a base coat of red. Once it’s dry, use a small brush or a toothpick to create Santa’s face. A round white dot for his face and two smaller black dots for his eyes will bring him to life. Don’t forget his iconic red hat! You can add a little white pom-pom at the tip using the same white polish.
If you’re feeling extra creative, try adding some glitter to make Santa sparkle! A little gold or silver on his belt buckle can create an even jollier effect.
Once you’re done, seal everything with a top coat to keep your festive nails looking fresh. So gather your supplies and get ready to spread smiles, because who wouldn’t love a little Santa magic on their nails this holiday season?
Elegant Holly Leaves
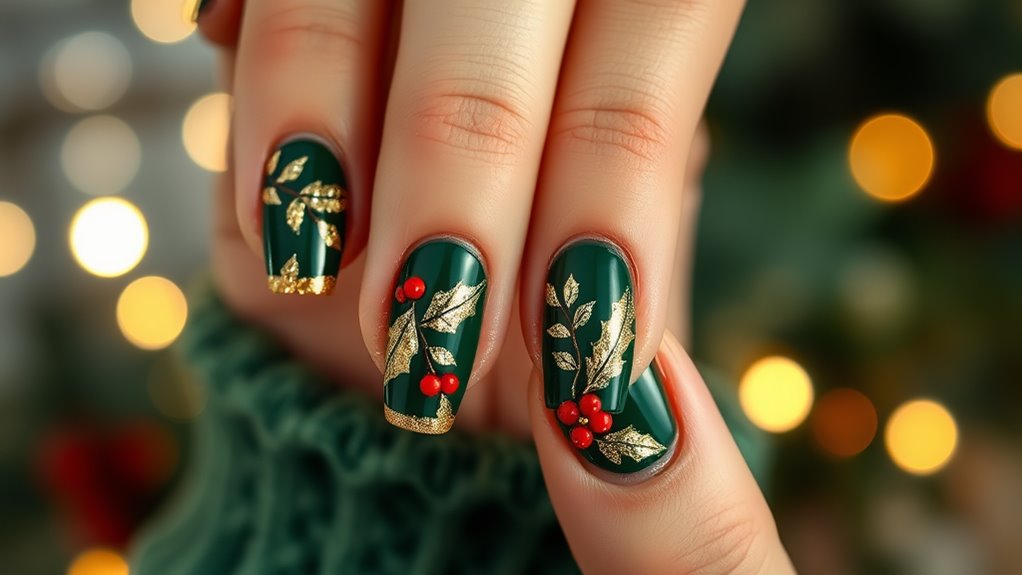
While getting into the holiday spirit, adding elegant holly leaves to your nails can bring a touch of sophistication to your festive look. Imagine this: a deep green base with vibrant holly leaves delicately painted across your fingertips. It’s not just nail art; it’s a celebration of the season!
To start, grab a dark green polish for your base. Once it’s dry, use a thin nail brush or a toothpick to create the holly leaves. Dip into a lighter green polish for the leaves and don’t worry about making them perfect—nature is wonderfully imperfect!
For that extra festive flair, add tiny red dots to represent the berries. Just a few of these can make your nails pop!
You can mix and match styles, too. Try a full set of holly leaves on one hand, while keeping the other hand simple with a solid color. This playful contrast adds a fun twist to your overall look. Plus, it’s a great conversation starter!
Winter Wonderland Scene
After adding the elegant touch of holly leaves, why not embrace the magic of a winter wonderland scene on your nails? Imagine tiny snowflakes dancing across your fingertips or a frosty landscape capturing the beauty of the season. Creating this look is easier than you might think!
Start by choosing a light blue or snowy white base color. Once that’s dry, grab a thin brush or a toothpick to dot on some snowflakes. You can create different sizes—big ones for the center and tiny ones for the edges. If you’re feeling extra creative, paint a little snowman or a cozy cabin on one nail. Just think of it as your mini canvas!
Don’t forget to add a touch of glitter to mimic sparkling snow. This will give your nails that extra pop and make them shine like the winter sun. Finish with a clear topcoat to seal in your masterpiece.
Now you’ve got a dazzling winter wonderland right at your fingertips! So, grab your nail tools and let your imagination run wild. You’ll be the envy of everyone at holiday gatherings, showcasing your festive flair!
Conclusion
So there you have it—eight fun and festive DIY Christmas nail designs to brighten up your holiday season! With just a few colors and some creativity, you can turn your nails into little works of art. Whether you choose candy canes or jolly Santa faces, your nails will definitely spread cheer! Grab your nail polish, invite some friends over, and get crafting. Who knows, you might just start a new holiday tradition! Happy decorating!