
When the holiday season rolls around, your nails can be a delightful canvas for festive expression. You don’t need to spend hours at the salon; with just a few tools and a bit of creativity, you can achieve a cheerful look in minutes. From classic red and green designs to whimsical snowflakes, there’s something for everyone. You might be surprised by how easy it is to transform your nails into a festive accessory. If you’re curious about the specific designs that can elevate your holiday style, keep going to discover your next nail art project.
Key Takeaways
- Start with a base coat and a quick-drying top coat for a polished, long-lasting finish.
- Choose simple designs like candy cane stripes or festive dots to save time.
- Use a limited color palette of classic red, green, and white for easy coordination.
- Incorporate glitter accents for a festive touch without complicated techniques.
- Allow proper drying time between layers to avoid smudging and enhance your designs.
Classic Red and Green

The joy of the holiday season often inspires vibrant nail designs, and nothing captures that spirit quite like classic red and green. These colors are like the candy canes and Christmas trees that fill your holiday dreams! You can easily create a festive look that’ll make your nails the talk of the party.
Start with a solid base coat to protect your nails. Then, choose a bright red polish for one hand and a rich green for the other. If you’re feeling adventurous, you can mix and match! Maybe paint your ring finger a festive gold for a little extra flair.
Don’t forget to let each coat dry before adding the next; you want your masterpiece to shine!
For some extra pizzazz, consider adding simple designs. A few dots, stripes, or even a tiny Christmas tree can take your nails from ordinary to extraordinary. Remember, it’s all about having fun!
And if you mess up? No worries! Just laugh it off and try again. After all, the holidays are all about spreading joy—starting with your fabulous nails!
Glittery Snowflakes
If you’re looking to add a touch of winter magic to your holiday nails, glittery snowflakes are the perfect choice. These sparkly designs can transform your nails into a winter wonderland in just a few minutes. Plus, who doesn’t love a little shimmer?
To create your glittery snowflakes, start with a base coat in a soft blue or frosty white. This sets the perfect backdrop for your festive design. Once that’s dry, grab a nail art brush or a toothpick and dip it in white polish.
Then, gently draw your snowflakes. Don’t worry about being perfect; nature’s snowflakes are all unique, after all!
To really amp up the sparkle, sprinkle some fine glitter on top while the polish is still wet. This will give your snowflakes that dazzling, magical look.
Finish with a top coat to seal everything in place and make your nails shine even brighter!
You’ll be the star of every holiday party with these eye-catching designs. So, grab your nail supplies, let your creativity flow, and get ready to show off your glittery snowflakes this Christmas season!
Candy Cane Stripes
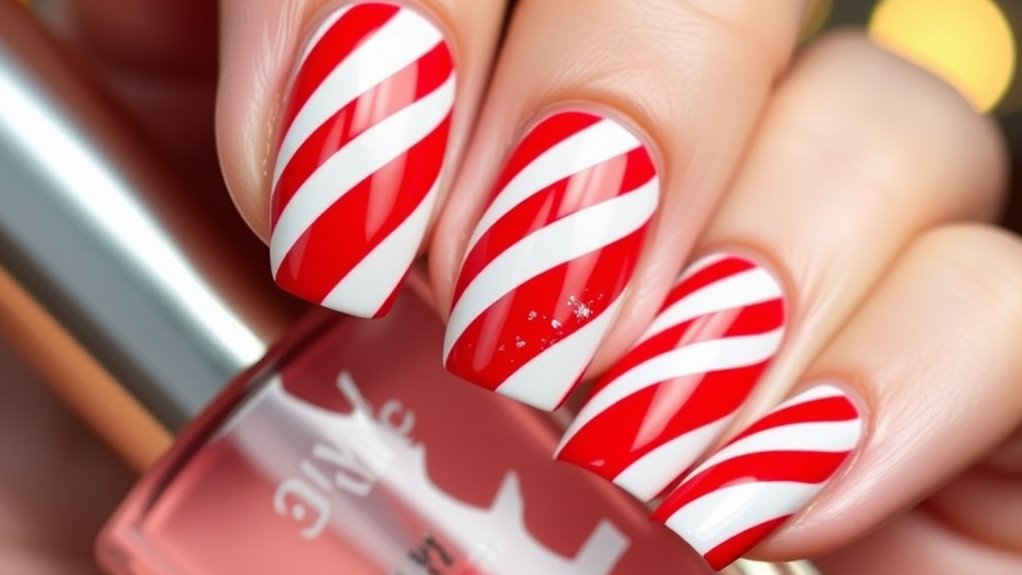
Looking to bring some classic holiday cheer to your nails? Candy cane stripes are the perfect way to do it! This design isn’t only festive but super easy to create. Grab some red and white nail polish, and let’s get started!
First, paint your nails with a solid white base. It’ll make those vibrant red stripes pop!
Once that’s dry, take your red polish and a thin nail brush, or even a toothpick, to create diagonal stripes. Don’t worry if they’re not perfect; candy canes are all about that fun, whimsical vibe!
If you want to elevate your look, add a touch of sparkle with some glitter polish on top or around the edges of the stripes. This’ll give your nails a magical holiday glow!
Festive Christmas Trees
Nothing says holiday spirit like festive Christmas trees adorning your nails! Picture tiny green trees glimmering with colorful ornaments right at your fingertips. You can create this fun design in just a few minutes!
Start with a base coat of a cheerful color, like bright red or snow-white. Once that’s dry, grab a green polish for your trees. Using a thin brush or a toothpick, draw a simple triangle shape for each tree. Don’t worry about being perfect; Christmas trees come in all shapes and sizes!
Add some playful touches! Use a tiny dot of yellow or gold polish at the top of each triangle for a star. Then, with a contrasting color, add little dots or lines for ornaments. You can even use glitter polish to give your trees some extra sparkle.
Feeling extra creative? Try alternating colors or sizes for a more whimsical look. It’s your chance to show off your personality!
Once you’re satisfied with your festive trees, seal the deal with a top coat to make everything shine. Now, you’ve got a delightful holiday manicure that’ll have everyone admiring your festive spirit!
Simple Holiday Dots
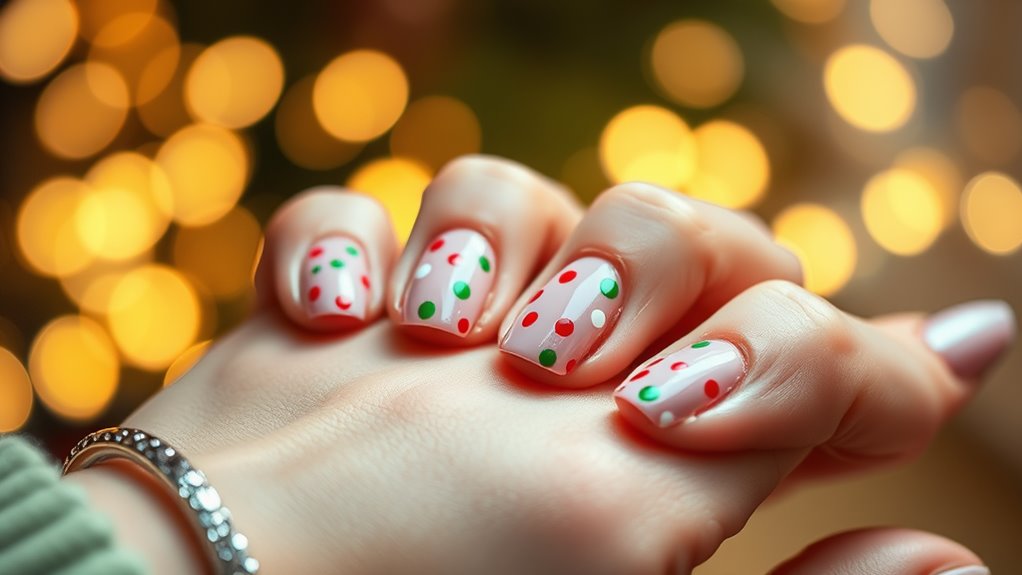
You can often achieve a charming holiday look with simple holiday dots! This nail art technique isn’t only quick but also super fun to create. All you need are a few nail polish colors—think red, green, white, or even sparkly gold—and a dotting tool or a toothpick.
Start by painting your nails with a base color. If you want to go festive, a classic red or a cheerful green works great!
Once that’s dry, grab your dotting tool. Dip it into your chosen polish and start making dots on your nails. You can create patterns like polka dots, or even a candy cane effect by alternating colors.
Don’t worry about perfection; the charm of holiday dots is in their playful nature! You can mix sizes too, using the end of a toothpick for tiny dots and a dotting tool for larger ones.
Finish with a clear top coat to seal the design and add some shine. You’ll love how easy it’s to get into the holiday spirit with these cute nails!
Elegant Gold Accents
Elegant gold accents can elevate your holiday nail art from simple to stunning in just a few easy steps. You don’t need to be a nail artist to achieve this chic look; all you need is a steady hand and a little creativity!
Start by painting your nails with a base color of your choice—deep red, emerald green, or even classic white works beautifully.
Once your base coat is dry, grab a gold nail polish or a gold nail art pen. Now, here comes the fun part! You can create thin lines, dots, or even delicate swirls on your nails. Try adding a touch of gold to the tips for a classy French manicure twist, or make tiny stars for a festive sparkle.
If you’re feeling adventurous, you can use gold foil for a luxurious effect; just apply a little clear topcoat and press the foil onto your nails.
Finish off with a good topcoat to seal in your masterpiece. Trust me, these elegant gold accents will make your nails the talk of any holiday party!
Reindeer Nail Art
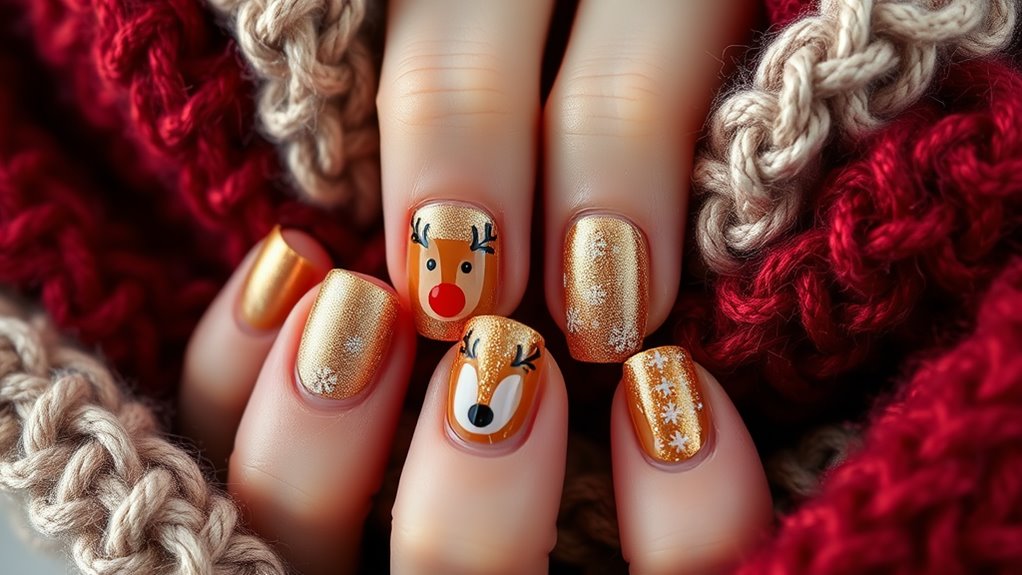
If you’re looking to add a playful touch to your holiday nail art, reindeer designs are a whimsical choice. Imagine tiny reindeer prancing across your nails, bringing a smile to anyone who sees them! You don’t need to be a nail art expert to create this festive look.
Start with a cozy brown base coat, and let it dry completely.
Next, grab a small nail art brush or a toothpick if you’re in a pinch. Dip it in white polish to create the reindeer’s face. You’ll need two round dots for eyes and a larger one for the nose—don’t forget the signature red nose to make it extra festive!
For the antlers, use a darker polish to add a couple of swooping lines on top.
Feeling adventurous? You can even sprinkle some glitter around your reindeer for a magical touch! Just make sure everything is dry before applying a clear top coat to seal your masterpiece.
In just a few minutes, you’ll have adorable reindeer nails that’ll make you the star of any holiday gathering. So, grab your polishes and let your creativity run wild—your nails are about to get festive!
Snowy Winter Wonderland
Transforming your nails into a snowy winter wonderland is a delightful way to embrace the season. You’ll feel as if you’re stepping into a cozy cabin surrounded by white snowflakes every time you glance at your hands!
To achieve this look, start with a light blue or soft white base coat. It sets that chilly winter vibe perfectly.
Once your base dries, grab a white nail polish or a nail art pen to create fluffy snowflakes and gentle swirls. Don’t worry about making them perfect; the charm lies in their uniqueness!
If you want to go the extra mile, sprinkle some iridescent glitter on top for that magical shimmer, like sunlight hitting fresh snow.
For added flair, consider using tiny rhinestones to represent icicles hanging from your fingertips—because who doesn’t love a little bling?
Finish off with a clear top coat to seal everything in and give your nails a glossy shine.
In just a few minutes, you’ll have nails that aren’t only festive but also a fun conversation starter. Get ready to show off your winter wonderland at holiday parties, and enjoy the compliments coming your way!
Jolly Santa Faces

After embracing the serene beauty of a snowy winter wonderland, it’s time to add a touch of whimsy with jolly Santa faces on your nails. Imagine this: a tiny Santa, complete with his fluffy white beard and red hat, smiling right at you from your fingertips! It’s a fun way to show off your holiday spirit, and you can create these cheerful designs in no time.
Start with a bright red base to make your Santa pop. Once that’s dry, use a small dotting tool or a toothpick to add a white beard, a pink nose, and those twinkling eyes. Don’t forget to give him a cute little hat at the top!
If you want to get extra creative, use a bit of gold or silver glitter to make his hat sparkle.
These jolly Santa faces are perfect for any Christmas gathering and are sure to bring smiles all around. Plus, your friends will be asking how you did it!
Christmas Ornaments Design
Decking your nails with Christmas ornaments is a delightful way to embrace the holiday spirit! Imagine tiny, colorful baubles sparkling on your fingertips—it’s like carrying a mini Christmas tree wherever you go!
To start, gather some nail polish in festive colors like red, green, gold, and silver. You’ll also need a thin nail art brush or a dotting tool for those tiny details.
Begin with a base coat to protect your nails and apply your favorite color. Once it’s dry, you can get creative! Use the brush to paint little circles in various colors, resembling ornaments. Don’t forget to add accents like tiny lines or stars to make them pop! For an extra touch of sparkle, sprinkle some glitter on top before sealing it with a clear coat.
If you’re feeling adventurous, try mixing up the designs—some nails can have ornaments, while others can sport candy canes or snowflakes. This way, you’ll create a festive nail art masterpiece!
Conclusion
Now that you’ve got these fun and festive nail designs in your arsenal, it’s time to get creative! Whether you’re going for classic red and green or a playful Santa face, these quick looks will surely put you in the holiday spirit. Grab your nail polish, gather your friends, and let the nail art party begin! Remember, the only limit is your imagination, so don’t be shy—let your nails shine as bright as your holiday cheer!